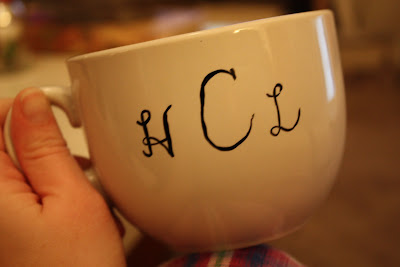
My Christmas gifts for friends this year were all personalized, and my girls in Johnson City got mugs with their monograms on them. As with most things that I decorate free-handed, I typed it up in Word and then found a font that I liked. This one is called KG Eyes Wide Open.
Then I very nervously started painting*. I just started with one thin stroke for each letter, and then went back with a thicker brush and kept adding to it until I got it to my liking. After I was done painting I "baked" them in the oven according to the directions on the paint bottle.
It took about ten minutes to paint each one, and since the mugs were inexpensive and I already had the paint, the results were easy, budget-friendly gifts that everyone loved!
* I used Folk Art Enamel Acrylic Paint. This is the same paint I used to paint these personalized Mr. and Mrs. mugs as a wedding shower gift.
Wednesday, December 26, 2012
Thursday, December 20, 2012
Stuffed
I spent the afternoon with the staff and a few students stuffing our winter newsletter with remittance envelopes. Unfold. Place. Refold. Repeat. Repeat. Repeat. Repeat...It took a few hours but we watched Elf and ordered a pizza and it wasn't bad at all. After we were done some of us went to Menchies to get some frozen yogurt. And as always, mine weighed the most out of everyone!
Wednesday, December 19, 2012
Brown Paper Packages Tied Up with String
When it came to my gift wrapping this year I new I wanted to keep it simple and, as much as possible, use things I already had. And I managed to do just that! In fact, all I bought was an extra roll of paper, and haven't had to open it yet.
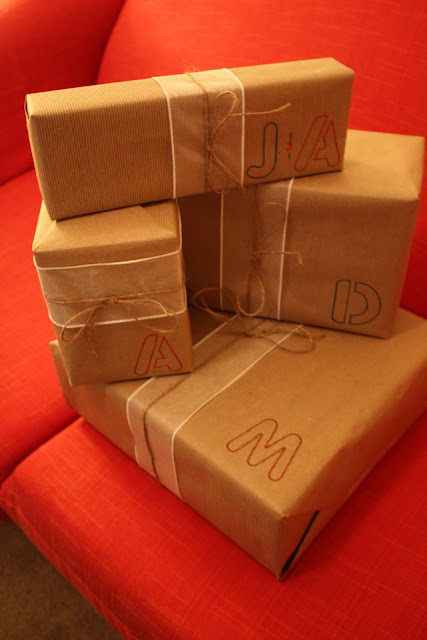
I wrapped everything in brown paper, wrapped a piece of wide, sheer, shiny ribbon around the middle, and then tied a piece of twine around that. I just made it up as I went along, and I wasn't sure how it would turn out, but I really like the contrasts in dull and shiny, and simple and elegant.
When it came to the "tags" I knew they would need to be simple too. Since there would be no repeats or confusion, I decided to just use letters. M for Mom, D for Dad, A for Amanda, and J for Jonathan. I found some stencils and played around with different ways of filling them in, and landed on the simple outline. No surprise there I guess!
And thanks to Pinterest, I found a way to jazz up the addresses on my Christmas cards. Just don't go stalking my friends!
Back At It
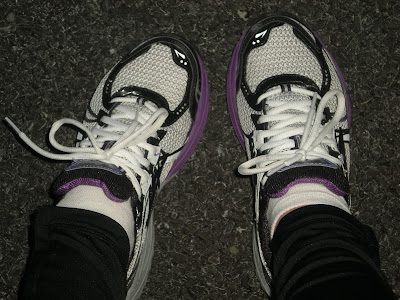
New shoes are nice to look at all, but it means they haven't seen enough pavement. I'm aiming to change that over the Christmas break. Tonight was night number two of running, followed by a deeee-licious salad from Earth Fare!
Tuesday, December 18, 2012
Gooey Cinnamon Muffins
Don't let the pictures above fool you, this recipe proved to be quite the challenge.
The first mishap was with the filling. In an effort to speed up the "softening" process I nuked the butter, which (not surprisingly) completely melted it. I used it anyways but it made the filling way too runny, so I had to toss it and start over.
The second problem was that I filled the muffin liners too full. Instead of just making the muffins taller, it made the tops spread over wider, and that made getting them out of the muffin tins quite difficult. 7 of them turned out like normal looking muffins, and 5 of them turned out like this...
Thankfully I was just making these for fun and didn't need the full dozen! So why don't we just focus on the pretty ones again?
Gooey Cinnamon Muffins
Ingredients
- Preheat oven to 400°
- Line muffin tin with cupcake liners, or spray with cooking spray.
- Mix all ingredients together with a fork until crumbly. Set aside.
- Mix all ingredients together until consistency is similar to a loose frosting or pudding. Set aside.
- In a large bowl whisk together butter, milk and eggs. In another bowl combine flour, oats, cornstarch, sugar, baking powder, salt, nutmeg and white chips.
- Pour the dry ingredients into the wet and stir until just combined.
- Using half the batter, fill each muffin tin with 2 Tbsp batter. Then drop 2 tsp of filling into each tin. Finish, by dropping another 2 Tbsp of batter on top. Depending on the size of the muffin tin, you may get more than 12 muffins.
- Now sprinkle your topping evenly on the muffins (about 1 tbsp on each).
- Bake 20-25 minutes until centers are set.
- Cool on wire rack.
- Combine butter, sugar and milk, stirring until there are no lumps, adding more powdered sugar or milk until desired consistency is reached. Drizzle on muffins when ready to serve.
- Drizzle with glaze when ready to serve.
Topping:
1/2 cup brown sugar, packed
1/3 cup old fashioned oats
1/2 cup all purpose flour
3 Tbsp softened butter
1/4 tsp cinnamon
Filling:
3 Tbsp softened butter
1/2 cup light brown sugar
3 tsp cinnamon
5 tsp water
Muffin:
1/2 cup butter, melted
3/4 cup milk
2 large eggs
1 3/4 cups all purpose flour
1/2 cup old fashioned oats
2 Tbsp cornstarch
3/4 cup granulated sugar
1 tbsp baking powder
1 tsp salt
1/4 tsp ground nutmeg
1/2 cup white chocolate chips
Glaze *optional:
1 cup powdered sugar
1 Tbsp softened butter
2 Tbsp milk
Directions
Topping:
Filling:
Muffins:
Glaze:
Friday, December 14, 2012
Christmas Cards - Present and Past
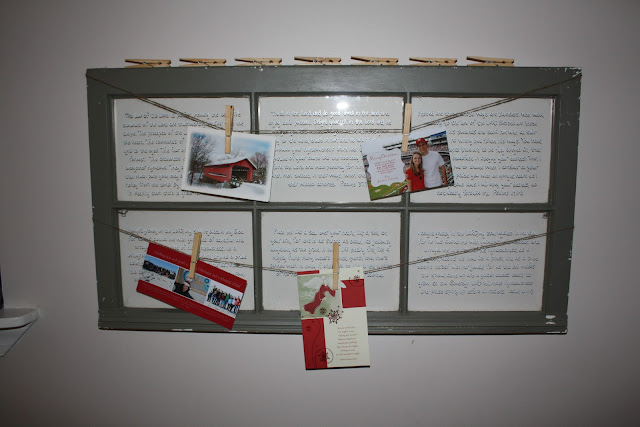
Since I've lived on my own, I've never found a way to display Christmas cards in a way that I like, until this year. I looked at my green window one day, and it just came to me - attach two lengths of twine, and hang Christmas cards with clothes pins. I sat down tonight and in about 15 minutes had it rigged up! For the top piece, I just tied the twine around the two brackets used to hang it on the wall. For the lower piece, I used two push pins on the outer-most edges and attached the twine to those.
Then I just hung the window back up and clipped up my Christmas cards. I love how it turned out! Very simple and Christmasy.
 |
| Since I took this picture I took all the extra clothes pins and put them in a little mason jar on the ledge between the kitchen and living room. |
I also used a Pinterest idea to display Christmas cards from years past. Over the years I've received many Christmas cards that include pictures, or are picture compilations themselves. I love having them out during the season, but once they've been tucked away somewhere, they rarely see light again. Not anymore though! I pulled out all of the pictures, put them in order, punched holes in the corner, put them on a hinged ring, attached a bow, and set them out for all to see. It's a great way to look back at pictures from year's past, and then at the end of this season I'll just add the new ones I've gotten.
 |
| A lovely little addition to the coffee table :) |
Monday, December 10, 2012
Mug Monday
I haven't done a Mug Monday post since this summer, but last week I got another one! It was a gift from Ivy, one of our student leaders, and one of the girls I get the privilege of spending time with every week; and it seemed appropriate that she gave me a mug. Every Tuesday morning she comes over to my apartment, I brew a pot of coffee, we fix a cup, and settle into the corners of my couches. Her on the red one, and me on the dingy-but-so-comfy whitish one. We talk about school, guys, ministry, God - and I've really come to love these Tuesday morning coffee dates.
Friday, December 7, 2012
Ornament Stories
I did a post like this last year, showcasing some of my Christmas tree ornaments and explaining the stories behind them. You can read that post here; and now here are some more stories!
I received this Chinese flag ornament last Christmas, because in May of 2011 I went on a trip there.
Another camera/photographer ornament that I received last Christmas.
I bought this one last December at the Museum of Modern Art gift shop. My 25th birthday present from my parents was a trip to New York City right after Christmas, and one of the things I just had to do was go to the MoMA. I wasn't even looking for an ornament in the gift shop, but when I saw it I had to get it. It has fake glittery snow inside of it, and says MoMA 2011 on the other side.
This little Patriots helmet has a bell inside and was in my stocking last Christmas. It's one of two Patriots ornaments on my tree.
I went to Disney World for the first time in the spring of 2010; it was the "fun day" on our spring break missions trip to Florida. The only two souvenirs I had to get were a mug and ornament of course. You can't really tell by looking at it, but it's also a bell. I got my mom the same one in gold, because she likes ornaments too.
On our spring break mission trip last year we went to Chicago, and I got this beautiful ornament in the shops on the famous Navy Pier.
Thursday, December 6, 2012
Thrifty Thursday - Christmas Decorations
Way back this summer I did some redecorating, and replaced the apothecary jars I had in my bathroom with mason jars. I hung on to the apothecary jars though, because I had seen something on Pinterest that I wanted to do at Christmas. So last week I went on the hunt to find things to fill my jars with, and I started at Goodwill. On their Christmas shelf I found two packages of ornaments, one for .97 cents and one for $1.77, and then later I found a bag of pinecones for $2.97. I wasn't sure if I would use all of it, but for that price figured it would be worth getting. I also bought a pack of mini candy canes at Kroger.
When I got home I just started sticking things in jars and rearranging them until I had a combo I liked. And I felt better when I used something from all of my Goodwill purchases, since I combined both kinds or ornaments in one jar. In all honesty, I know that bigger jars or smaller objects would look a little better, cause I could put more stuff inside, but I'm not going to stress about it, or go buy more things. It's still fun and Christmasy, and because I already had the jars, cost me about $6. And, I can get more use out of the pinecones, since they're not limited to just Christmas decor.
Tuesday, December 4, 2012
ModPodged Color Wheel Picture Frame
Several weeks ago I had a girl's night with some of the girls in my freshman small group, and if you know me, you know that means there were crafts - more specifically, ModPodge. I had planned on going to the dollar store to pick up some frames to decorate, but while I was at Target I found some frames on clearance for .94 cents. Even though they were different, I decided to get some because they were cheaper and would save me a trip to another store.
Tabletop View
I wanted to add a little Christmas spirit to my spot in the office, so I hung colorful lights around my window! To put them up, I had to climb up on my desk, which has a glass top on it. As I was staring down at myself I thought, "This would make a fun blog picture," and so I took it!
Sunday, December 2, 2012
Thanksgiving
Obviously this is a little late for a Thanksgiving recap, but I still wanted to do it. My family went to Maine for Thanksgiving this year! That's where my dad's whole family lives, and my cousin and her family drove over from Michigan. I hadn't been to Maine in about six years I think, and it's been that long since we've all been together too. While literally half of my time off was spent in the car, and our two days in Maine were very busy and full, I'm so glad we went!
After our Thanksgiving lunch I introduced my cousins to the Mac photo booth.
Then we we drove into Portland and visited the Portland Head Light.
 |
| The coast in Maine is rocky, not sandy. |
 |
| I love sun glare :) |
 |
| Just doing my thing. |
 |
| I love that you can see the moon in this one! |
 |
| Jonathan, Amanda, Mom, and I. |
After that we went to Freeport and went to the L.L. Bean store. We tried on hats and I got up close and personal with some fish!
On Friday we drove to Kennybunk where we climbed around on the rocks for a while and ate seafood of course! Later in the day we also got pizza and ice-cream twice! All from local places.
 |
| That's George Bush's summer home in the back. |
 |
| Seaweed in a tide pool. |
 |
| It was kind of bizarre to be so close to the waves and hear them crashing, and smell the salt water, yet be wearing boots, a scarf, hat, and gloves. |
 |
| Family picture. |
Subscribe to:
Posts (Atom)


