Showing posts with label Christmas. Show all posts

Tuesday, February 4, 2014

"Connected At The Heart" Gift

This post is long overdue, but I've been slightly preoccupied lately, what with the whole moving to another country in a few weeks thing happening.  But for Christmas this year I wanted all of my gifts to have an England theme to them.  Coming up with something for my mom, dad, and brother-in-law was  pretty easy but I had no idea what to get my sister.  Their spare bedroom has a travel theme to it and has a big map in it, and had been pinning lots of gifts idea that had to do with traveling, so I decided to go that route.

These pins were my inspiration:


via


And this was my final product:


I started by finding a map of Virginia in an atlas and tearing it out.  Then I printed off a map of Virginia from the computer, cut it out, and used it as a template to cut out Virginia from the map.  I made sure that Blacksburg was in a relatively accurate place on the map.


Next I found a picture of a map of England, one that had a similar look to the atlas map.  Then I printed it off and cut it out.  It wasn't until then that I realized I should have done that for Virginia too.  It would have been proportionate and would have saved a step of cutting.  Oh well, you live and learn!

I laid the two maps out on a piece of card stock, and then I started looking for a quote I wanted to use.  I found the one I used on Pinterest, and then I practiced writing it several different ways until I came up with an arrangement I liked.  I wrote it in pencil first and then went over it in Sharpie.


The final step was drawing red hearts around the cities of Blacksburg and Birmingham, and then connecting the two with a dotted line that formed a heart.


Tuesday, December 31, 2013

Wednesday, November 20, 2013

A Pink and Purple Package

I've written a few times about putting together packages for friends that have a theme to them, sometimes a color or a season.  I recently put together another package, and everything in it was pink or purple.  The best part about putting this one together?  It's a shoebox gift for Operation Christmas Child.  Hopefully the little girl that gets this one is girly, because it's full of pink, purple, and sparkles.  I tried to have a balance of fun and practical items and think I managed to do just that, all while keeping with the color scheme.


Monday, January 14, 2013

DIY "Sweet Treat" Plates

As mentioned in December, I made/decorated all of my Christmas gifts for friends this year.  My girls in Johnson City got monogrammed mugs, and for my friends from home, I decorated plates for them to put snacks and desserts - sweet treats - on.  I wanted to find plates that had a wide rim or edge on it, and I found fun colorful ones at Target for about $5 a piece!

As always, I typed up sweet treats in Word and found a cute font, this one was called Love Letters, downloaded from dafont.com.  Then I used a black medium point Sharpie paint marker to write sweets treats all around the rim of the plate.  One great thing about swirly, curly fonts like this is that if you mess up a little bit you can't really tell!  Every time I wrote it, it looked different than the time before, but you don't notice.  I signed the back of the plates and then baked them in the oven for 30 minutes for 350.*  I loved how they turned out, and I kind of want to make one for myself now!


Wednesday, December 26, 2012

DIY Monogram Mugs

My Christmas gifts for friends this year were all personalized, and my girls in Johnson City got mugs with their monograms on them.  As with most things that I decorate free-handed, I typed it up in Word and then found a font that I liked.  This one is called KG Eyes Wide Open.


Then I very nervously started painting*.  I just started with one thin stroke for each letter, and then went back with a thicker brush and kept adding to it until I got it to my liking.  After I was done painting I "baked" them in the oven according to the directions on the paint bottle.


It took about ten minutes to paint each one, and since the mugs were inexpensive and I already had the paint, the results were easy, budget-friendly gifts that everyone loved!


* I used Folk Art Enamel Acrylic Paint.  This is the same paint I used to paint these personalized Mr. and Mrs. mugs as a wedding shower gift.


Wednesday, December 19, 2012

Brown Paper Packages Tied Up with String

When it came to my gift wrapping this year I new I wanted to keep it simple and, as much as possible, use things I already had.  And I managed to do just that!  In fact, all I bought was an extra roll of paper, and haven't had to open it yet.

I wrapped everything in brown paper, wrapped a piece of wide, sheer, shiny ribbon around the middle, and then tied a piece of twine around that.  I just made it up as I went along, and I wasn't sure how it would turn out, but I really like the contrasts in dull and shiny, and simple and elegant.

When it came to the "tags" I knew they would need to be simple too.  Since there would be no repeats or confusion, I decided to just use letters. M for Mom, D for Dad, A for Amanda, and J for Jonathan.  I found some stencils and played around with different ways of filling them in, and landed on the simple outline.  No surprise there I guess!


 And thanks to Pinterest, I found a way to jazz up the addresses on my Christmas cards.  Just don't go stalking my friends!


Friday, December 14, 2012

Christmas Cards - Present and Past

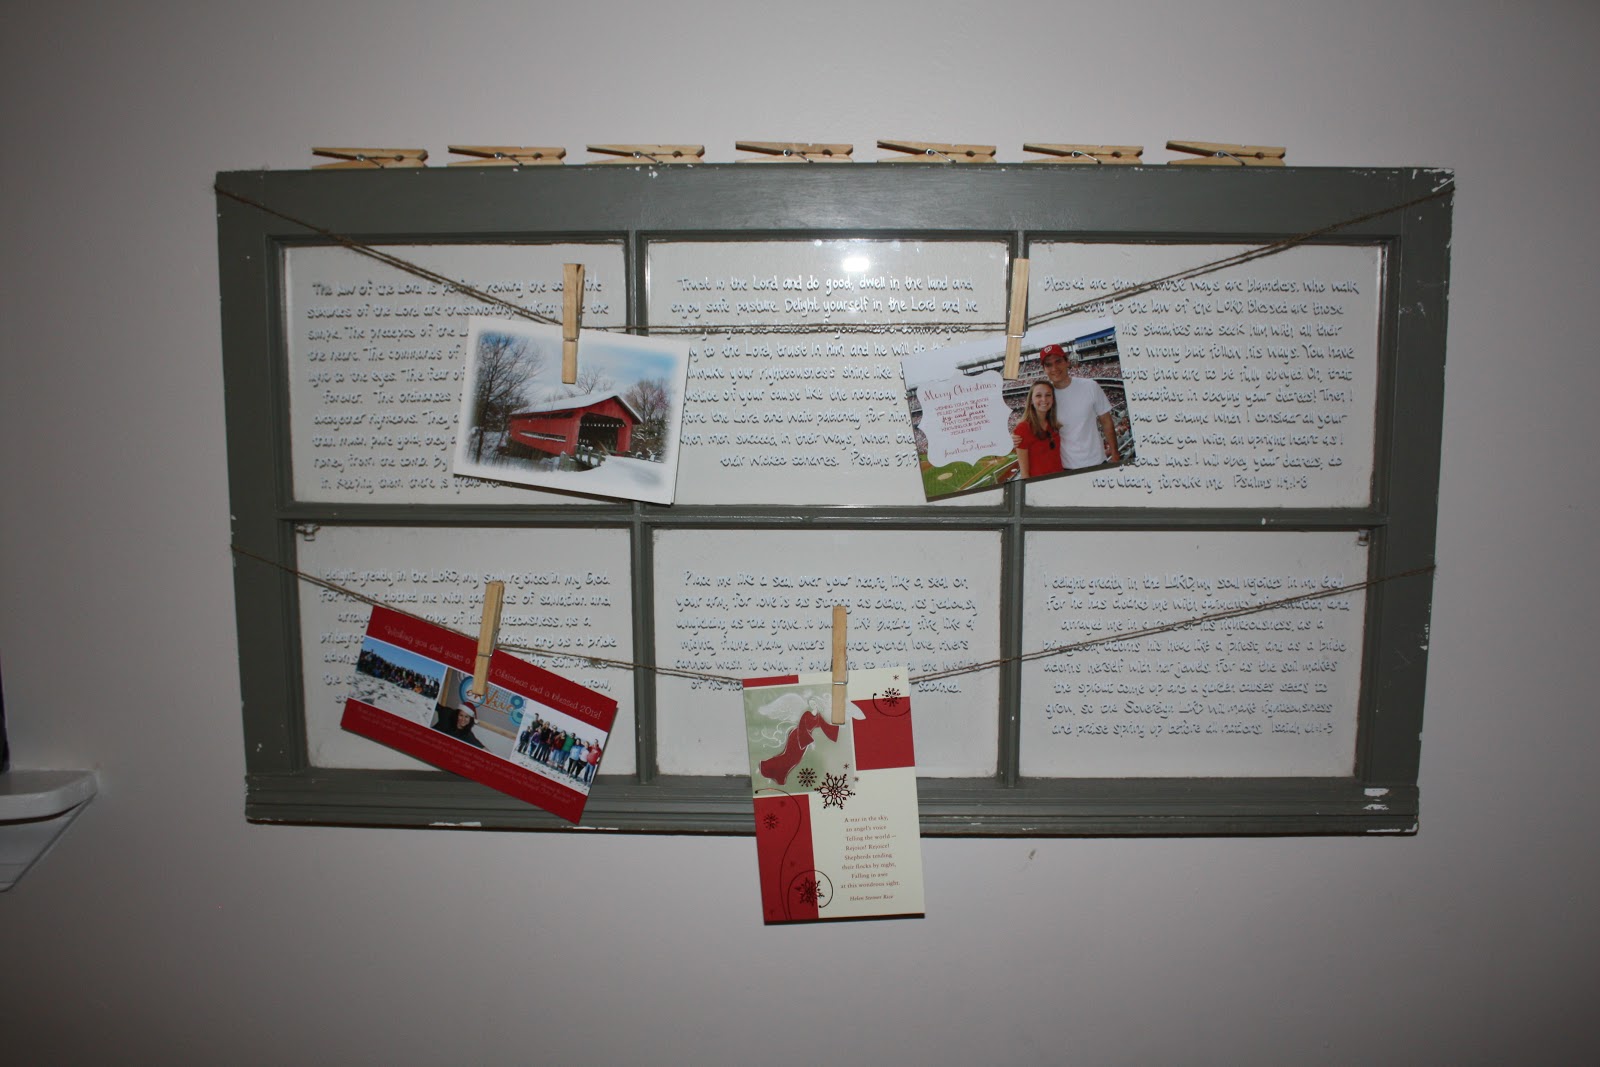
Since I've lived on my own, I've never found a way to display Christmas cards in a way that I like, until this year.  I looked at my green window one day, and it just came to me - attach two lengths of twine, and hang Christmas cards with clothes pins.  I sat down tonight and in about 15 minutes had it rigged up!  For the top piece, I just tied the twine around the two brackets used to hang it on the wall.  For the lower piece, I used two push pins on the outer-most edges and attached the twine to those.


Then I just hung the window back up and clipped up my Christmas cards.  I love how it turned out!  Very simple and Christmasy.

Since I took this picture I took all the extra clothes pins and put them in a little mason jar on the ledge between the kitchen and living room.


I also used a Pinterest idea to display Christmas cards from years past.  Over the years I've received many Christmas cards that include pictures, or are picture compilations themselves.  I love having them out during the season, but once they've been tucked away somewhere, they rarely see light again.  Not anymore though!  I pulled out all of the pictures, put them in order, punched holes in the corner, put them on a hinged ring, attached a bow, and set them out for all to see.  It's a great way to look back at pictures from year's past, and then at the end of this season I'll just add the new ones I've gotten.

A lovely little addition to the coffee table :)


Friday, December 7, 2012

Ornament Stories

I did a post like this last year, showcasing some of my Christmas tree ornaments and explaining the stories behind them.  You can read that post here; and now here are some more stories!


I received this Chinese flag ornament last Christmas, because in May of 2011 I went on a trip there.


Another camera/photographer ornament that I received last Christmas.


I bought this one last December at the Museum of Modern Art gift shop.  My 25th birthday present from my parents was a trip to New York City right after Christmas, and one of the things I just had to do was go to the MoMA.  I wasn't even looking for an ornament in the gift shop, but when I saw it I had to get it.  It has fake glittery snow inside of it, and says MoMA 2011 on the other side.


This little Patriots helmet has a bell inside and was in my stocking last Christmas.  It's one of two Patriots ornaments on my tree.


I went to Disney World for the first time in the spring of 2010; it was the "fun day" on our spring break missions trip to Florida.  The only two souvenirs I had to get were a mug and ornament of course.  You can't really tell by looking at it, but it's also a bell. I got my mom the same one in gold, because she likes ornaments too.


On our spring break mission trip last year we went to Chicago, and I got this beautiful ornament in the shops on the famous Navy Pier.


Thursday, December 6, 2012

Thrifty Thursday - Christmas Decorations

Way back this summer I did some redecorating, and replaced the apothecary jars I had in my bathroom with mason jars.  I hung on to the apothecary jars though, because I had seen something on Pinterest that I wanted to do at Christmas.  So last week I went on the hunt to find things to fill my jars with, and I started at Goodwill.  On their Christmas shelf I found two packages of ornaments, one for  .97 cents and one for $1.77, and then later I found a bag of pinecones for $2.97.  I wasn't sure if I would use all of it, but for that price figured it would be worth getting.  I also bought a pack of mini candy canes at Kroger.  


When I got home I just started sticking things in jars and rearranging them until I had a combo I liked.  And I felt better when I used something from all of my Goodwill purchases, since I combined both kinds or ornaments in one jar.  In all honesty, I know that bigger jars or smaller objects would look a little better, cause I could put more stuff inside, but I'm not going to stress about it, or go buy more things.  It's still fun and Christmasy, and because I already had the jars, cost me about $6.  And, I can get more use out of the pinecones, since they're not limited to just Christmas decor.


Tuesday, December 4, 2012

Tabletop View

I wanted to add a little Christmas spirit to my spot in the office, so I hung colorful lights around my window!  To put them up, I had to climb up on my desk, which has a glass top on it.  As I was staring down at myself I thought, "This would make a fun blog picture," and so I took it!


Sunday, December 2, 2012

Operation Christmas Child

I'm sure you're familiar with Operation Christmas Child, the Christmas time "shoebox gifts" for children around the world.  Thousands of these boxes are collected all across the country and then they are taken to one of seven processing centers to be prepared to ship overseas.  And one of those processing centers happens to be in Boone, North Carolina, which is less than an hour and a half away from Johnson City!  Each year we have the incredible opportunity to take a group of students there to prepare the shoeboxes, and that's what we did last Thursday!  The OCC facility is a huge warehouse that has assembly lines set up, and everyone has a job to do to prepare the boxes.  This year my job was to go through each box and make sure there were no items in it that weren't ok to ship, things like liquids and food.  I went through hundreds of boxes over the course of three hours.  It was so neat to realize that the gifts I was looking at would soon be in the hands of children in Africa!  I loved picturing little girls dressed up in beads and toy tiaras, and boys playing with Hotwheels and throwing footballs.  My favorite boxes were the ones where the families and children that packed them included letters and pictures; hand drawn cards scribbled with crayon are the best.  I'm so thankful to have this opportunity to be a small part of blessing hundreds of thousands of children at Christmas!


Thursday, November 29, 2012

The Thrill of Hope

Yesterday ended up being a pretty crazy day, which led to a crazy night, which means I ended up not taking a single picture at The Well.  And that's rare.  I really wanted to show you the finished letters that spelled out HOPE, so I stole reused this Instagram picture that a student took.  Needless to say, this doesn't do it justice at all, but I wanted to give you an idea.  Again, the H is dozens of round Christmas ornaments, the O is a wreath, the P is covered in Christmas lights, and the E is made up of gifts.  Next week I'll do my best to have some better pictures!


Tuesday, November 27, 2012

Wrapping For a Reason


I'm sure I have said this before, but one thing I love about my job is that I get to do a wide variety of things; a wide variety of random things sometimes.  I spent a good part of today wrapping empty boxes with Christmas wrapping paper.  They're for the set design for these last two weeks of The Well, where we'll have large letters spelling out HOPE hanging above the drums.  Each letter will be decorated with a different Christmas decoration.  H will be covered with round Christmas ornaments, O will be a big wreath, P will be covered in lights, and the E is covered with gifts.  I'm glad that I know though, that these random things do serve a purpose.  They're helping to create environments that appeal to students and help them engage in worship!

Pictures of the finished product will come later this week!

Related Posts Plugin for WordPress, Blogger...